


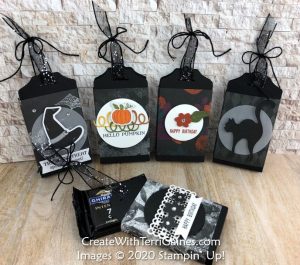
Today’s project is a fun Halloween candy holder made with supplies from the September 2020 Paper Pumpkin Kit along with a few additional materials & supplies.
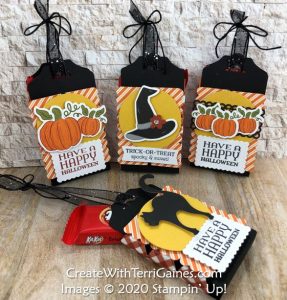
Half of a double-sided Cracker Box piece is used per candy holder.
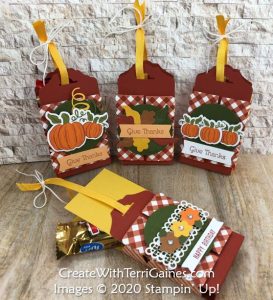
For the below samples I used the Magic in this Night Designer Series Paper instead of the Cracker Box piece.
HOW PAPER PUMPKIN WORKS
Paper Pumpkin by Stampin’ Up! is a crafting subscription kit that delivers creativity to your door every month. Each box includes everything you need to make a stunning project. We’ll surprise you with projects like cards, gift packaging, home décor, and more. Talk about happy mail!
WHAT’S INSIDE YOUR MONTHLY BOX?
With Paper Pumpkin, you’ll save time and money while you build a collection of crafting supplies. Every month you’ll receive a unique stamp set with an ink spot (that won’t repeat a color in a 12-month period). In no time at all, you’ll have a variety of stamps and ink to use on other projects. In addition, your first kit includes a free clear stamping block that you’ll use every month.
Check out the below video for a sneak a peek at the Jolly Gingerbread Paper Pumpkin Kit (November 2020 Kit).
To get November Paper Pumpkin kit subscribe by the 10th of the November. There are two ways to order Paper Pumpkin:
- Subscribe to the monthly kit by clicking here
- Or purchase 1-month, *3-month, *6-month or *12-month Prepaid Subscription.


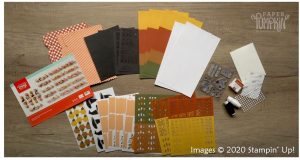
September 2020 Paper Pumpkin Kit Includes:
♥ Hello Pumpkin Photopolymer Stamp Set
♥ Cajun Craze Stampin’ Spot
♥ Baker’s twine (two colors: Black & White)
♥ 20 double-sided Cracker Boxes
♥ Die-cut pieces and labels
♥ Lazer-cut pieces
♥ Dimensionals
♥ Adhesive dots
♥ Adhesive strips
Additional Supplies:
♥ Stamp Set: Itty Bitty Greetings (151331- cling)
♥ Ink Pad: Memento (132708)
♥ Cardstock / Paper: Basic Black Cardstock (121045), Bumble Bee Cardstock (153077), Cajun Craze (116684), Mossy Meadow Cardstock (133676), Pumpkin Pie Cardstock (105117), Whisper White Cardstock (100730), Magic in this Night Designer Series Paper (153517), Carsstock Vellum (101856)
♥ Ribbon & Embellishments: Black 3/8″ Glittered Organdy Ribbon (147897), Bumble Bee 1/4″ Ribbon (153622), Rhinestone Basic Jewels (144220)
♥ Tools / Misc: Fancy Tag Topper Punch (152711), 2″ Circle Punch (133782), Paper Trimmer (152392), Stamparatus (146276), Classic Label Punch (141491), Stampin’ Seal (152813; refill 152814)
Measurements:
♥ Main Cardstock: 2″ x 8-1/2″ scored at 4″ & 4-1/2″
♥ Insert Card Cardstock (optional): 1-7/8″ x 6-1/2″ scored at 3″ & 3-1/2″
♥ Designer Series Paper (optional): 2-3/4″ x 5-1/2″ scored at 1-1/4″, 1-3/4″, 3-3/4″ & 4-1/4″
♥ Ribbon: 12″ of ribbon and 10″ of baker’s twine
Cracker Box Prep work:
♥ Score long edge at 2″, 2-1/2″, 4-1/2″ & 5″. Cut Cracker Box in half (three sections per piece).
Instructions:
1. Punch each end of 2″ x 8-1/2″ cardstock with Fancy Tag Topper Punch. Fold at score line.
Tip: If you are making more than one candy holder score 8-1/2 x 11 cardstock at 4″ & 4-1/2″ before cutting 2″ strips.
2. Fold **Cracker Box on new score lines and apply adhesive on center panel. Line bottom edge of Cracker Box paper to be about 1/4″ above fold of cardstock & adhere. Fold end panel on one end of Cracker Box and apply adhesive on back and wrap to front of cardstock to adhere; repeat for other side. Lift end panels and adhere in place with Dimensionals.
3. Slide ribbon into openings made with Fancy Tag Topper Punch. Then insert Candy (or Insert Card folded on score lines) between cardstock and slide all the way to bottom (fold of cardstock).
4. Tie ends of ribbon together with baker’s twine to secure.
5. Embellish as desired.
**To use Designer Paper instead of Cracker Box: Fold Designer Series Paper on score lines and apply adhesive on center panel. Line bottom edge of designer series paper to be about 1/4″ above fold of cardstock & adhere. Apply adhesive on both ends of Designer Paper. Wrap one end of Designer Paper around and adhere to cardstock making sure bottom edge of designer series paper is about 1/4″ above fold of cardstock. Repeat for other end of Designer Paper.
Click here to download printable project sheet with instructions & dimensions for this project.
The below video shares tips for assembling this card.
Note: My videos are unedited and may contain bloopers (misspoken words or technical errors).

Great news from Stampin’ Up!… they have a Designer Series Paper Sale October 1 thru 31st.

We all love the gorgeous Designer Series Paper Stampin’ Up! offers, and during this incredible sale, you can enjoy a 15% discount on select papers from the current catalogs! Now is a great time to stock up and save on some of our most popular paper designs!
CLICK HERE to download PDF of Designer Series Paper Flyer
If you don’t have a Stampin’ Up! Demonstrator I would love to have you place your Stampin’ Up! order with me. Use my October Host Code to receive extra ‘Thank you’ gifts from me (see details below)

My October 2020 Host Code Special:
♥ Place a $30 Stampin’ Up! order (before shipping & tax) using my Host Code (4BNAJYM7) and receive a *Technique Card Packet & link to video as my Thank You gift! (details below)
*Technique Card Packet Details: The packet contains materials for one full size technique card & mini card to attach to instruction postcard with link to unlisted YouTube video for assembly instructions. All materials are cut and ready to stamp & assemble (use your own adhesive, stamps & inks).
Note:Each month I will feature a different technique.
♥ Place a $50 Stampin’ Up! order (before shipping & tax) with me using my Host Code (4BNAJYM7) and receive a *Technique Card Packet (details above), plus receive a **Create with Terri Card Kit Packet as my Thank You gift! (details below).
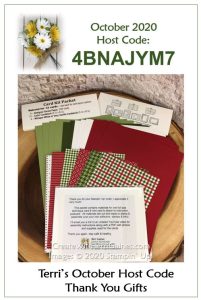
**October 2020 Create with Terri Card Kit contains: six – 4″ x 6″ Designer Series Papers (one each of the Heartwarming Hugs designs), twelve – 5-1/2″ x 8-1/2″ coordinating color cardstock (4- Real Red, 4 – Pear Pizzazz, 4 – Mossy Meadow) and four – 5-1/2″ x 8-1/2″ Whisper White
Click here to learn more about my Create with Terri Card Kit Packets.
Click here to watch video with details on a few suggested card designs using a Create with Terri Card Kit Packet (Note: This video was created July 2019 with a different Host Code offering… see current month’s offering for ‘Thank You Gift’ when using my Host Code).
Stampin’ Up! Products shared on this blog post: (click product image(s) below for direct link to my Stampin’ Up! store):


 Glittered Organdy Ribbon")
 2020–2022 In Color Ribbon")


 Circle Punch")


So cute and what a great use of those little pieces from the September 2020 Paper Pumpkin kit. That was such a fun kit. Have been playing with it for weeks, making fun cards. And now I’m going to make a candy holder! TFS
Thank you Wanda! The September 2020 Paper Pumpkin is a fun kit! Happy Creating!!!